The Complete Guide To Planting Houseplants In Pots & Planters
Creating a thriving green interior or container display does not have to be a hit and miss affair. Following a few simple planting techniques will ensure your indoor and outdoor plants have the right environment from the outset to reward you with lush, relaxing greenscapes set in beautiful decorative pots and planters.
The Golden Rule - Watering & Drainage
Getting the watering and drainage right is the key to thriving plants. Overwatering is the most common maintenance mistake and probably the easiest way to kill a plant. The roots sit in excess water and gradually rot, taking away the plants ability to absorb nutrients and moisture.
The risks of overwatering can be reduced with good drainage. The traditional indoor approach uses plant pots with drainage holes in the bottom that sit in a saucer to catch the excess water as it drains through the soil. This solution does limit the style of decorative pots you can use and may not achieve the interior design look you want.
Modern decorative pots and planters come in all types of materials from ceramic, natural, composite, metal and fibreglass to create that wow factor in their setting. Typically, they do not have drainage holes and the materials are not always designed to be waterproof.
We therefore need to make sure the plant has good drainage and the decorative pot is protected from water and soil to keep it looking pristine and avoiding damage to floors and furnishings.
Indoor Planting
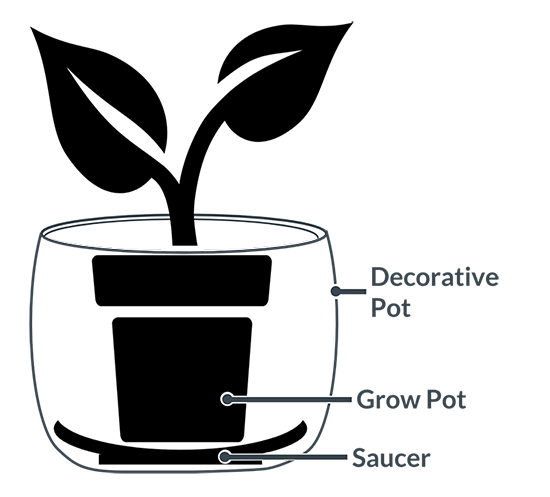
Cache Pot & Saucer
Put a saucer inside the decorative (cache) pot and place the grow pot on the saucer, if space allows. If required, you can raise the height of the plant so it sits better in the pot by adding some pebbles or hydro granules at the bottom of the planter.
You can take the plant out of the decorative pot to water and drain in a sink before replacing or water in the decorative pot. The saucer will catch excess water which you may need to empty.
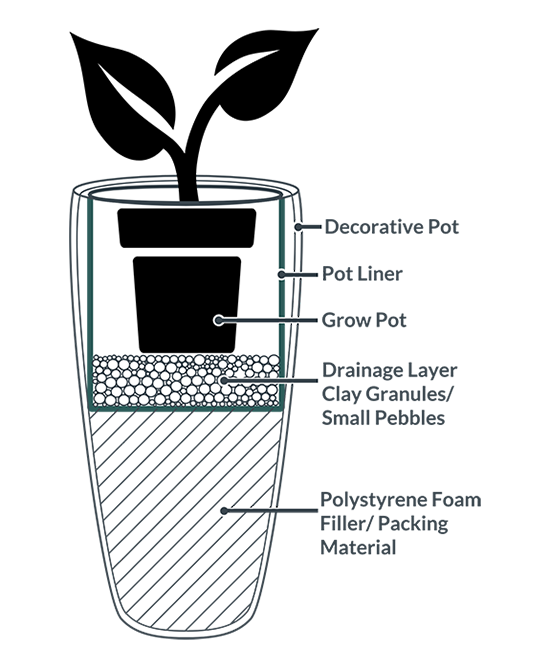
Cache Pot & Pot Liner
If taking the plant in and out of the decorative pot to water or empty excess water from a saucer is not your thing. You can add a liner to the decorative pot and some drainage material.
Pot liners are made from "squashy" plastic and come in different sizes to fit the internal dimensions of the decorative pot. They can be trimmed down to size to create an unobtrusive barrier that protects the decorative pot and your furnishings.
Liners are ideal for taller planters and other situations where you want to raise the height of the plant in the planter. Fill the base with packing material that will not compress e.g. polystyrene foam and then place the liner on top at the right height for the plant.
Place a layer of drainage material e.g. small pebbles or hydrogranules on the base of the liner. Hydrogranules are baked, expanded clay granules that absorb excess water.
Sit the plant in the grow pot on the drainage layer. If necessary add more pebbles around the sides of the grow pot to provide additional support and hold the plant in position. If you do excessively overwater the plant, you may need to refresh the drainage layer occasionally to remove any stagnant water.
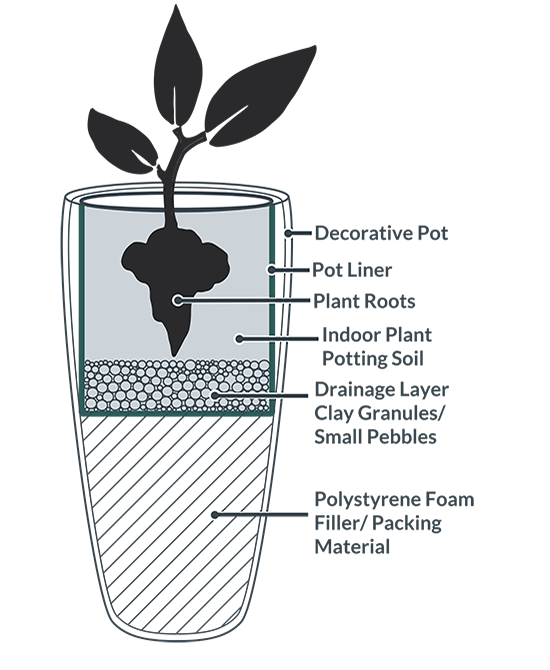
Repotting in a Pot Liner
If you want a more harmonious look between your plant and decorative pot rather than simply hiding the grow pot, then consider repotting in a liner. Just follow these easy steps:
- If you have a tall planter, fill excess void in the pot or planter with polystyrene foam e.g. packing peanuts or broken up polystyrene pieces. Ensure that your void fill is a solid structure and will not compress overtime.
- Insert a pot liner sized for the pot you are using and allowing for a drainage layer of hydrogranules or pebbles at a suitable depth for the plant (typically 2-5cm). Cut the pot liner to size with kitchen scissors for a neat line at the rim of the pot.
- Place the drainage layer of hydrogranules/ pebbles on the bottom of the liner.
- Fill up the rest of the liner with indoor plant potting soil and insert the plant in it. Note: do not use soil from the garden or garden compost which may contain disease.
- Cover the surface of the soil with decorative stones or pebbles to suit your interior and give a flush finish between the rim of the pot and the plant.

Hydroculture - The Ultimate Easy-Care Solution
Hydroculture plants have long been the choice of professional interior designers. In hydroculture, plants are cultivated in hydrogranules rather than soil.
Hydrogranules are baked and expanded clay granules designed to hold water and nutrients and let it pass gently back to the plant roots. This means, no mess, no soil pests, no risk of over watering, less watering (every 4-5 weeks) and less feeding (every 4-6 months).
When watering the plant, the layer of hydrogranules at the base of the grow pot and liner will act as a reservoir trapping and holding water and nutrients for release back to the plants.
The plant root systems are surrounded by optimum moisture, nutrients and air in the hydroganules, and adapt by becoming fleshier, with a smaller rootball than standard soil potted plants. This results in strong, healthy plants that are more adaptable to planting in different sized containers, with limited need to repot as they grow.
Hydroculture also allows you to mix plants that have different watering requirements in a single decorative pot because each plant will take what it needs from the hydrogranules.
Planting a hydroculture plant in a decorative pot is simple. Just follow these easy steps:
- If you have a tall planter, fill excess void in the pot or planter with polystyrene foam e.g. packing peanuts or broken up polystyrene pieces. Ensure that your void fill is a solid structure and will not compress overtime.
- Insert a pot liner sized for the pot you are using. Cut the height of the pot liner to size with kitchen scissors for a neat line at the rim of the pot, ensuring that the hydroculture grow pot will sit on the bottom of the liner at the correct height for the plant.
- Place the plant in its hydroculture grow pot on the base of the liner.
- Place a water meter at the side of the grow pot for an accurate indication of when to water.
- Fill the surrounding space between the grow pot and the pot liner with more hydrogranules to create a uniform layer of granules on the surface. When watering the plant, the layer of hydrogranules at the base of the grow pot and liner will trap and hold water for release back to the plants.
- If desired, cover the surface of the hydrogranules with decorative stones or pebbles to suit your interior and give a flush finish between the rim of the pot and the plant.
Outdoor Planting

Outdoor planters need drainage holes to allow rainwater to pass through and avoid water-logging the plants root system.
If you plan to leave the planter outdoors all year, ensure that it is frost proof. To prevent ice build up and cracking of the drainage hole make sure it is raised up from the floor, either by a recessed design or elevated on feet. Then follow these steps for easy planting:
- Cover the drainage hole in the bottom of the planter with a felt layer or separation-cloth. This will allow excess rainwater to drain through whilst retaining the clay hydro granules/pebbles in the bottom of the planter.
- Place a layer of clay hydro granules in the bottom to act as a water reservoir. Depending on the overall height of the planter, a layer approximately 10cm deep should be sufficient. For tall planters you may need to fill the base with void fill using bricks or larger stones before adding the drainage layer.
- We recommend using a felt layer or separation-cloth between the hydro granules and the soil. To prevent soil leaking into the hydro granules but still allowing water to pass up into the soil.
- Fill up the rest of the planter with potting soil and insert the plant.
- Cover the surface of the soil with decorative stones, pebbles or bark chips to suit your style and help reduce evaporation in warm weather.
Become A Hortologist
"Look deep into nature and then you will understand everything better."
~ Albert Einstein ~
We believe in the power of plants to lift the spirit, calm the mind and clean the air.